> ## Documentation Index
> Fetch the complete documentation index at: https://specterops-feat-poc-api-playground.mintlify.site/llms.txt
> Use this file to discover all available pages before exploring further.
# SAML in BloodHound
> BloodHound supports SAML 2.0 for Single Sign On to authenticate users to your tenant environment.
export const auth_mode_3 = "SAML"
export const auth_mode_2 = "SAML"
export const auth_mode_1 = "SAML"
export const auth_mode_0 = "SAML"
 You may configure multiple SAML providers within your tenant if necessary.
This page provides the overall steps to configure a SAML provider within BloodHound. We have provided walkthroughs for creating the configuration within the provider for your convenience.
## Order of Operations
Currently, BloodHound requires the configuration of SAML system in the following order:
1. Determine the Provider Name you will utilize for the SAML configuration.
* The same value must be configured in both the Identity Provider and BloodHound.
2. Configure Identity Provider for BloodHound.
* [SAML: ADFS Configuration](/manage-bloodhound/auth/saml-adfs)
* [SAML: Auth0 Configuration](/manage-bloodhound/auth/saml-auth0)
* [SAML: Entra ID Configuration](/manage-bloodhound/auth/saml-entra-id)
* [SAML: Google IDP Configuration](/manage-bloodhound/auth/saml-google)
3. Create the SAML Configuration in BloodHound.
4. [Create new users or modify existing users](/manage-bloodhound/auth/users-and-roles) using the UI or via the newly created SAML provider.
## SAML Attribute Quick Reference
| **Data Type
You may configure multiple SAML providers within your tenant if necessary.
This page provides the overall steps to configure a SAML provider within BloodHound. We have provided walkthroughs for creating the configuration within the provider for your convenience.
## Order of Operations
Currently, BloodHound requires the configuration of SAML system in the following order:
1. Determine the Provider Name you will utilize for the SAML configuration.
* The same value must be configured in both the Identity Provider and BloodHound.
2. Configure Identity Provider for BloodHound.
* [SAML: ADFS Configuration](/manage-bloodhound/auth/saml-adfs)
* [SAML: Auth0 Configuration](/manage-bloodhound/auth/saml-auth0)
* [SAML: Entra ID Configuration](/manage-bloodhound/auth/saml-entra-id)
* [SAML: Google IDP Configuration](/manage-bloodhound/auth/saml-google)
3. Create the SAML Configuration in BloodHound.
4. [Create new users or modify existing users](/manage-bloodhound/auth/users-and-roles) using the UI or via the newly created SAML provider.
## SAML Attribute Quick Reference
| **Data Type
** | **Value** |
| ---------------------------- | ---------------------------------------------------------------------------------------------------------------------------------------------------------------------------------------------------------- |
| **IDP Name Format** | urn:oasis:names:tc:SAML:2.0:attrname-format:uri |
| **Required SAML Attributes** | Either of the following will map to the user's email address in BloodHound:
`http://schemas.xmlsoap.org/ws/2005/05/identity/claims/emailaddress`
*urn:oid:0.9.2342.19200300.100.1.3* |
| **Optional SAML Attributes** | The following will map to the user's first name in BloodHound:
`http://schemas.xmlsoap.org/ws/2005/05/identity/claims/name`
|
| - | The following will map to the user's last name in BloodHound:
`http://schemas.xmlsoap.org/ws/2005/05/identity/claims/surname`
|
| - | The following will map to the user role in BloodHound:
`http://schemas.microsoft.com/ws/2008/06/identity/claims/role`
|
## User Role Mapping
First/last name and email are populated when the correct key/value are provided in the {auth_mode_3} assertion payload. If omitted, fields default to the user's email.
A role is applied when the role attribute/claim key is present and its value is a properly formatted BloodHound role.
Role values use the prefix `bh-` and are written in kebab-case.
See role definitions for capabilities and scopes: [Users and Roles](/manage-bloodhound/auth/users-and-roles)
| **Role** | **Key Value** |
| ------------- | ---------------- |
| Administrator | bh-administrator |
| Power User | bh-power-user |
| User | bh-user |
| Read Only | bh-read-only |
| Upload Only | bh-upload-only |
Only a single role value is accepted in the role claim. If multiple values are received, BloodHound ignores them and applies the provider’s default role. Ensure your IdP emits only one role value.
## BloodHound Icons
If your IDP supports custom icons for configured applications, please feel free to utilize the logos below:
* [Enterprise Dark-colored icon](https://raw.githubusercontent.com/SpecterOps/BloodHound-docs/main/docs/logo/BHE_PurpleField.png)
* [Enterprise Light-colored icon](https://raw.githubusercontent.com/SpecterOps/BloodHound-docs/main/docs/logo/BHE_WhiteField.png)
* [BHCE Dark-colored icon](https://raw.githubusercontent.com/SpecterOps/BloodHound-docs/main/docs/logo/BHCE_RedField.png)
* [BHCE Light-colored icon](https://raw.githubusercontent.com/SpecterOps/BloodHound-docs/main/docs/logo/BHCE_WhiteField.png)
## Create the {auth_mode_1} Configuration
Ensure you have configured an Identity Provider for BloodHound as described in Order of Operations before proceeding.
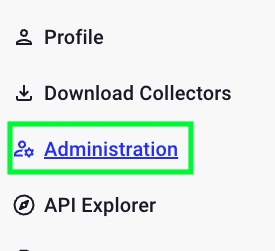
1. While logged in as an Administrator, open the slider on the left, then click "Administration."
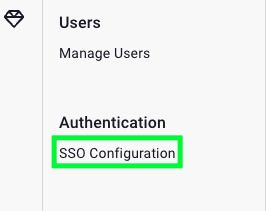
 2. Under the "Authentication" section, choose "SSO Configuration."
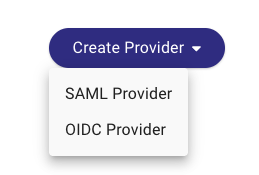
 3. Click "Create Provider," then "{auth_mode_1} Provider."
 4. Give the {auth_mode_1} provider the name you used in the ACS URL (‘okta’ in this example) and upload the metadata.xml you created previously. Click "Submit."
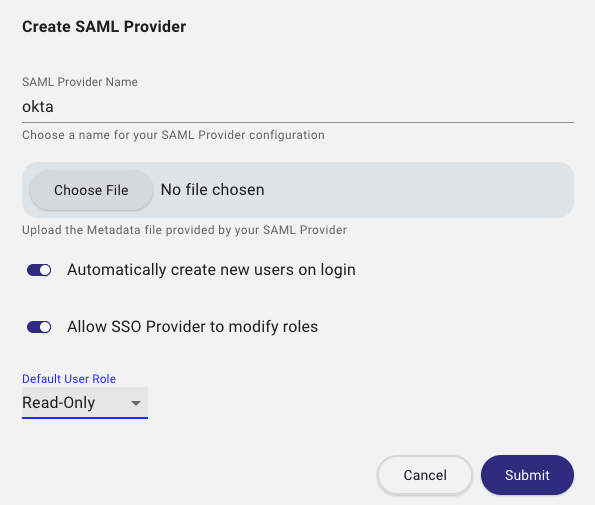 **Automatically create new users on login**
Enabling this option will have BloodHound create a new user on the first login with SSO (Just-In-Time). The user will be granted the role passed in the role claim if included, else the default role will be assigned.
**Allow SSO Provider to modify roles**
Enabling this option allows the SSO provider to modify user roles. This is accomplished by updating the role claim associated with the user account. The role will be updated on the next login.
To have this take effect immediately, disable then re-enable the user to invalidate current sessions and force a fresh login.
See [User Role Mapping](#user-role-mapping) for role claim reference.
5. BloodHound will provide the URLs related to this new {auth_mode_2} provider integration. Please take a moment to verify that the **ACS URL** matches the **Single sign on URL** specified in the {auth_mode_2} application integration page during setup of the {auth_mode_2} integration.
## Configure Users for {auth_mode_0} Authentication
By default, all users utilize a username and password via the built‑in authentication service. When creating or modifying a user, you can change this setting. When creating a new {auth_mode_0} user, ensure the {auth_mode_0} user does not share an email address with any other users (across all authentication methods).
1. While logged in as an Administrator, open the slider on the left, then click "Administration."
2. Under "Users" section, choose "Manage Users."
**Automatically create new users on login**
Enabling this option will have BloodHound create a new user on the first login with SSO (Just-In-Time). The user will be granted the role passed in the role claim if included, else the default role will be assigned.
**Allow SSO Provider to modify roles**
Enabling this option allows the SSO provider to modify user roles. This is accomplished by updating the role claim associated with the user account. The role will be updated on the next login.
To have this take effect immediately, disable then re-enable the user to invalidate current sessions and force a fresh login.
See [User Role Mapping](#user-role-mapping) for role claim reference.
5. BloodHound will provide the URLs related to this new {auth_mode_2} provider integration. Please take a moment to verify that the **ACS URL** matches the **Single sign on URL** specified in the {auth_mode_2} application integration page during setup of the {auth_mode_2} integration.
## Configure Users for {auth_mode_0} Authentication
By default, all users utilize a username and password via the built‑in authentication service. When creating or modifying a user, you can change this setting. When creating a new {auth_mode_0} user, ensure the {auth_mode_0} user does not share an email address with any other users (across all authentication methods).
1. While logged in as an Administrator, open the slider on the left, then click "Administration."
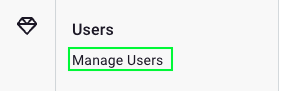
2. Under "Users" section, choose "Manage Users."
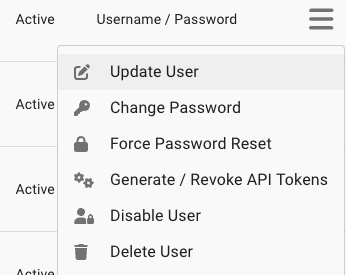
 3. Locate the user you wish to configure with authentication, click the hamburger menu button on the right side of the row, then "Update User."
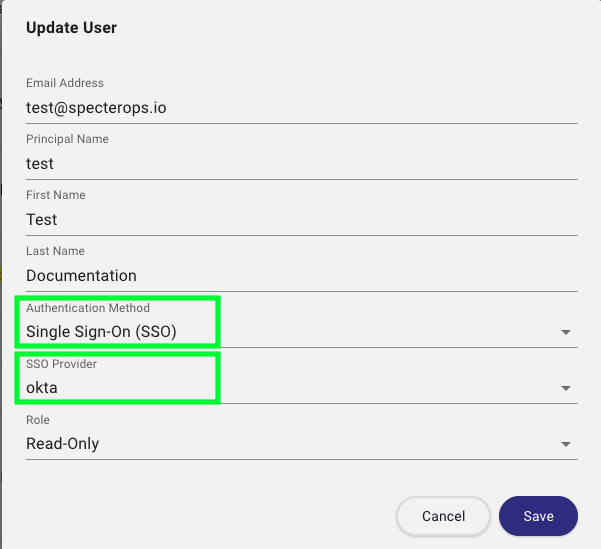
 4. In the following dialog, modify the authentication method to "Single Sign-On," then select the appropriate SSO provider against which the user's account can authenticate.
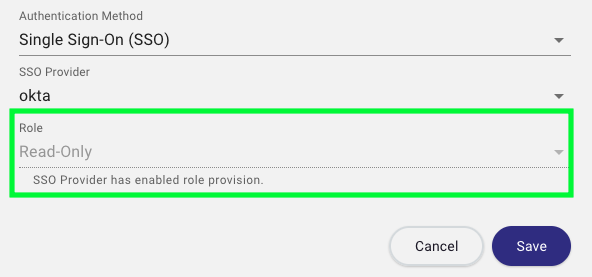
 * When Provisioning is enabled without the Modify Role option, a user's role may be updated manually after creation.
* If both Provisioning and Modify Role are enabled, role updates must come through the SSO provider (manual updates in BloodHound are disabled).
* When Provisioning is enabled without the Modify Role option, a user's role may be updated manually after creation.
* If both Provisioning and Modify Role are enabled, role updates must come through the SSO provider (manual updates in BloodHound are disabled).
 5. Click "Save."