> ## Documentation Index
> Fetch the complete documentation index at: https://specterops-feat-poc-api-playground.mintlify.site/llms.txt
> Use this file to discover all available pages before exploring further.
# SAML: Google IDP Configuration
> This document provides instructions for creating an application within Google for compatibility with BloodHound Enterprise.
 For general instructions on adding a SAML provider to BloodHound Enterprise, or for configuring users to utilize a SAML provider, see [SAML in BloodHound Enterprise](/manage-bloodhound/auth/saml).
See [SAML Order of Operations and Quick Reference](/manage-bloodhound/auth/saml) before starting.
## Create a Google Application
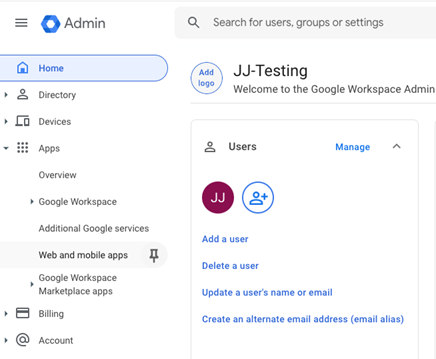
1. On the Admin Console for Google Workspaces, use the left navigation bar and go to Apps -> Web and Mobile Apps
For general instructions on adding a SAML provider to BloodHound Enterprise, or for configuring users to utilize a SAML provider, see [SAML in BloodHound Enterprise](/manage-bloodhound/auth/saml).
See [SAML Order of Operations and Quick Reference](/manage-bloodhound/auth/saml) before starting.
## Create a Google Application
1. On the Admin Console for Google Workspaces, use the left navigation bar and go to Apps -> Web and Mobile Apps
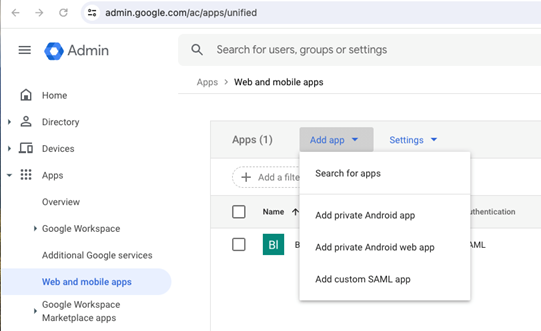
 2. Select “Add App” -> Add Custom SAML app
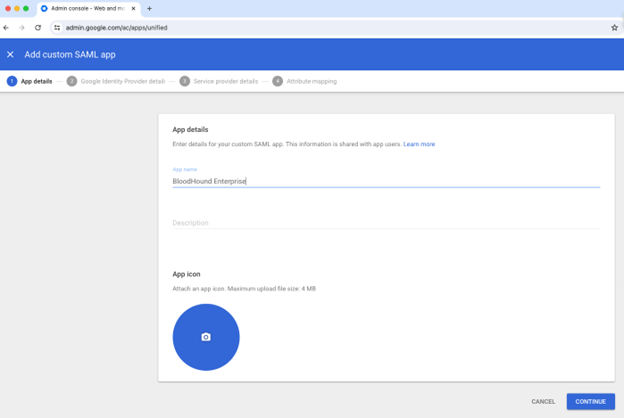
 3. Give the app an appropriate name, such as BloodHound Enterprise.
Optionally, add an icon and description.
3. Give the app an appropriate name, such as BloodHound Enterprise.
Optionally, add an icon and description.
 4. On the next screen, download the metadata file and continue.
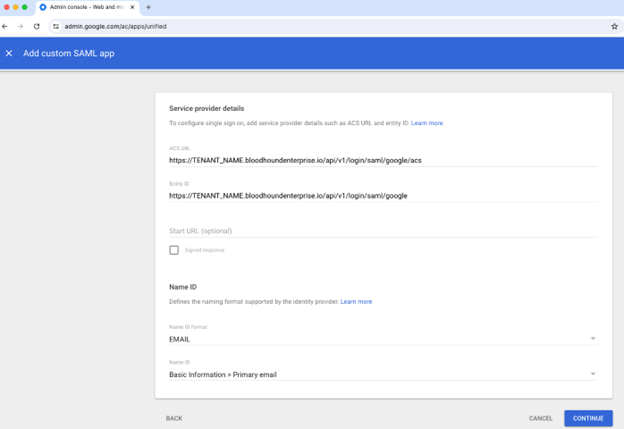
5. Enter the ACS URL and Entity ID as provided in the BloodHound Enterprise console:
4. On the next screen, download the metadata file and continue.
5. Enter the ACS URL and Entity ID as provided in the BloodHound Enterprise console:
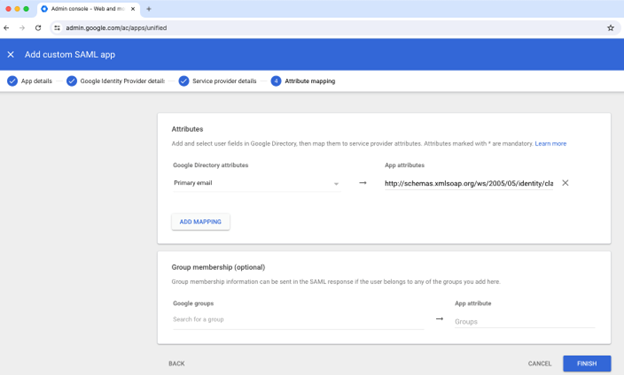
 6. On the next screen, it is required to send the email attribute to BloodHound.
BloodHound will accept either of the following values as the “App Attributes”:
* [http://schemas.xmlsoap.org/ws/2005/05/identity/claims/emailaddress](http://schemas.xmlsoap.org/ws/2005/05/identity/claims/emailaddress)
* urn:oid:0.9.2342.19200300.100.1.3
6. On the next screen, it is required to send the email attribute to BloodHound.
BloodHound will accept either of the following values as the “App Attributes”:
* [http://schemas.xmlsoap.org/ws/2005/05/identity/claims/emailaddress](http://schemas.xmlsoap.org/ws/2005/05/identity/claims/emailaddress)
* urn:oid:0.9.2342.19200300.100.1.3
 7. Follow the instructions at [SAML in BloodHound Enterprise](/manage-bloodhound/auth/saml) to create the SAML provider in BloodHound Enterprise.